Android Activity Quick Start
Declaring Activity
1.
In Eclipse click
File->New->Android Application Project
2.
Specify all required infrmation as shown below

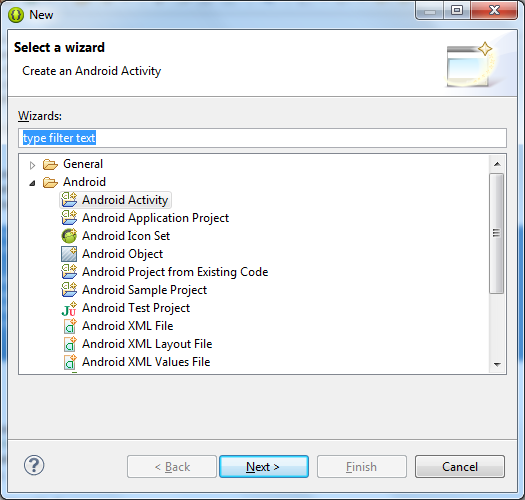
3.
Click Next antil
you reached activity creation step, and specify activity information as shown
below

4.Click
finish, your project will be created as shown below.

4.
Open up the
manifest file from the Package Explorer, and then click on the
AndroidManifest.xml tab at the bottom to
display the code that the IDE has produced.
Within the <activity> element, find the
following attributes:
android:name=".MainActivity"
android:label="@string/app_name"
5. Edit the code so that it matches
the following snippet:
<activity
android:name=".MainActivity"
android:label="Welcome to
Android Introduction"
android:screenOrientation="portrait">
...
</activity>
6.
To run your application you
need to create android virtual device , to do so click “Android Virtual
Device Manager” from task bar as shown in the figure below.

7.
You will be presented with virtual device
manager as shown below

8. Click
New and create new emulator and start .
9. Now
close all the dialog except the emulator , and return to your Eclipse IDE
10. To
run your application click Run ->Run
Starting a new activity with an intent object
1. Now
from package explorer go to res->layout and open main.xml
2. Next to </TextView> Insert button as shown below
<Button
android:id="@+id/callButton"
android:layout_width="fill_parent"
android:layout_height="wrap_content"
android:text="Call Log" />
3. Save
and close
4. From
package explorer got src and open MainActivity.java and put the following
method at the end inside the class
void startCallButton
() {
Intent myIntent = new Intent();
myIntent.setAction(Intent.ACTION_CALL_BUTTON);
startActivity(myIntent);
5. Insert
button click event listener code show
bellow in to onCreate() method next setContentView()
Button
cButton=(Button)findViewById(R.id.callButton);
cButton.setOnClickListener(new
View.OnClickListener() {
@Override
public void onClick(View arg0) {
// TODO Auto-generated
method stub
startCallButton();
}
});
6. Save
the project and run,and click the button
7. If
this generates an error message, it may be that the correct libraries have not
been imported. To use intents we have to import the relevant library, which can
be done with import android.content.Intent; however it's easy to get Eclipse to
import any missing libraries simply by pressing Shift + Ctrl + O.
Switching between activities
Often we will want to activate one activity from within
another. Although this is not a difficult task, it will require more setting up
than the previous two recipes as it will need two activities to be declared in
the Manifest, a new Class to serve as our second activity, and a button along
with a click listener to perform the switch.
1. Create
a new activity in the same location as the original activity subclass to do so:
Right
Click on your project->click New->click other
You
will be presented with the following dialog box.
2. Select
Android Activity and click next ->next until you reach new activity dialog
box and
Activity Name- MySubActivity
Layout
Name – mysub
And leave everything as it is and click
finish.
3. Next,
we must add a button that the user can click on to switch activities. This is
set up through the main.xml file which resides in the res/layout folder in the
Package Explorer.
4. Open
the main.xml file and click on the XML tab at the bottom so that the code can
be edited.
5. Add
the following <Button> element just after the call button from previous example y:
<Button
android:text="click to switch activities"
android:id="@+id/main_activity_button"
android:layout_width="wrap_content"
android:layout_height="wrap_content">
</Button>
6. Now
open the original Java activity class,.
7. Add
the following code to the onCreate() method after the setContentView(R.
layout.main); statement, making sure to replace the package and class
parameters in the setClassName() call with your own, as they will most likely
be different:
Button switchButton = (Button)
findViewById(R.id.main_activity_button);
switchButton.setOnClickListener(new
View.OnClickListener() {
@Override
public void onClick(View v) {
Intent
intent = new Intent();
String
packageName =
"com.example.mysimpleapp
";
String
className =
"com.example.mysimpleapp.MySubActivity";
intent.setClassName(packageName,
className);
startActivity(intent);
}
});
8.
Run the application on a device or emulator.
Clicking on the button will now start the sub activity.
Passing Data from one activity to another
1.
Create a new project
with these project name PassDataActivity. Leave everything else as it is by default
and click finish.
2.
Open activity_main.xml and put EditText and Button as shown below.
<EditText
android:id="@+id/messageText"
android:layout_width="match_parent"
android:layout_height="wrap_content"
android:ems="10"
>
<requestFocus />
</EditText>
<Button
android:id="@+id/sendButton"
android:layout_width="wrap_content"
android:layout_height="wrap_content"
android:text="Send"
/>
3.
In the package
explorer open MainActivity.java and add the following code to the
onCreate() method after the setContentView(R. layout.main);
Button
mSendButton=(Button)findViewById(R.id.sendButton);
mSendButton.setOnClickListener(new View.OnClickListener()
{
@Override
public void onClick(View arg0) {
// TODO Auto-generated
method stub
EditText MessageText=(EditText)findViewById(R.id.messageText);
Intent
intent= new Intent();
intent.setClassName("com.example.passdataactivity","com.example.passdataactivity.SecondActivity");
intent.putExtra("com_example_passdataactivity_id",
mMessageText.getText().toString());
startActivity(intent);
}
});
4.
Now time to create our
second activity, add new activity and name it SecondActivity. Leave everything as it
and click finish.
5.
From package explorer
Open SecondActivity.java and add the following code to the onCreate()
method after the setContentView(R. layout.main);
String msg=getIntent().getExtras().getString("com_example_passdataactivity_id
");
EditText
msgView=new EditText(this);
msgView.setText(msg);
setContentView(msgView);
6.
Run the application on a device or an
emulator.
No comments:
Post a Comment